Monday, September 5, 2016

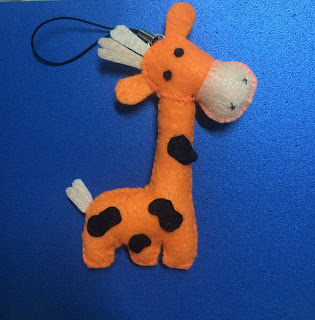
Giraffe key chain


Hi everyone! Long time no see, i am sorry because i'm very busy these days, i couldn't update frequently. Today i will show you how to make a handmade giraffe keychain . Because of time's problem, i can only show the pictures of steps i made. I hope you can catch it. I made this to sell for my clients on fiverr, if you are intersted in , you can come my gig and have a look or in case you dont have time to make this key chain you can buy it there
. If you have any confusions or questions, please feel free leave me a comment.


cut out these shape

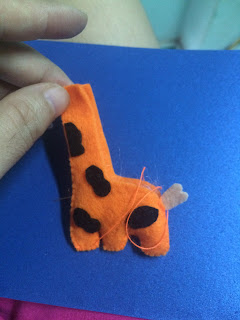
sew the small pieces on the body of giraffe 

sew same on two side of giraffe's body


sew two side of giraffe' s body together

Put Polyester fiberfill inside when you finished a half of body sewing

sew the head of giraffe 


sew eyes

We finished :)
Note: Because the neck and legs of giraffe are very high and narrow, it will be hard for you to put inside after finishing sewing completely, so that its better you put Polyester fiberfill step by step when you are sewing.
Thank you for reading!

Thursday, July 28, 2016

Handmade Pokemon Keychain


Its not strange that the name " Pokemon Go" is famous these day because many people really get crazy about this game. Someone even left their job to just play it :)
To catch the trend, why don't we make one Pokemon key-chain ? Really cool style.
Now lets start!

What we need:
Needle
Thread
Felt 
Polyester fiberfill
Keychain ring


First: Cut parts of felt Pokemon like in pattern (if you can't draw it well, you can get the pattern from the picture).


Sew parts together before sewing around whole pokemon


After sew mall parts together we sew around it, start at bottom, remember to put two ares and the keychain ring on top, then stop at the position where we have the hole to put polyester fiberfill inside. Sew the rest. We got the pokemon keychain


Thank you!
P/s: because of some problem of my phone, i couldn't post enough detail pictures, really sorry for that. 

Wednesday, July 13, 2016

Handmade Pokemon Cellphone Case


Hi everyone!
I made this cover for my phone (iphone 5s).

We can do the same cover for other kinds of phone or tablet.
Let's start

What we need:
Needle
Thread
Felt
Scissor
Button


Step1: 
Measure your phone then cut as below:
Cover length = phone length + phone thickness + 1cm
Cover width = phone width + phone thickness +1 cm
Then cut all other shapes like in picture out


Step2:
Step by step, we sew the parts together


Step: 3
Sew the button to keep our phone better.


Thank you :)

Thursday, April 14, 2016

Cute handmade carrot felt keychain


Today i will show you how to make a cute handmade carrot keychain. This one i made for my colleagues when i worked for a fruit store, its shape is same the store's logo. That's why it has the orange leaves instead of a green one. If you want, you can make it with a green leaf, i'm sure it will be much cuter


Let's go!

What we need:
Needle
Thread
Felt 
Polyester fiberfill
Keychain ring


Cut parts of felt carrot like in pattern (if you can't draw it well, you can get the pattern from the logo of this web here.
Sew around it and stop at the position nearby the leaf.


Put polyester fiberfill inside


Sew the leaves ( you can use green leaves)
Note: At the end of sewing, we sew many rounds, so that we can attach the keychain ring firmly after that.


Attach the keychain ring, the we got a cute carrot keychain 


Have a nice day.
(Thocon)

Wednesday, April 13, 2016

Decorate flowers - Heighten feelings


Do you know? According to behavioral research conducted at Rutgers, The State university of New Jersey, nature provides us with a simple way to improve emotional health - FLOWERS. The presence of flowers triggers happy emotions, heightens feelings of life satisfaction and affects social behavior in a positive meaner far beyond what is normally believed. For more information from this  you can read here.                        

That's why there is often a vase of flowers in my living room or on the table where i work . It's really make my mood better, feel comfortable.. You can chose any kinds of flower you love, but better it can keep long-lived. The flower i like is orchid because it has many kinds, many colors and long-lived.
 Especially, when the orchids almost fade, we can take full advantage of the rest of orchids and make other kind of decorating your place. Like below picture i made.
  
Simply, we only need to put a little water into a deep dish or a wide glass flower vase and then put the flower into. we can also put chrysanthemums, jasmine, or rose petals, etc... instead of orchids.


With simple steps, we can renew our place, refresh our emotion.
Just do it.

(Thocon)

Tuesday, April 12, 2016

Making card and picture frame - 2 in 1

Its really happy when we receive a gift from someone and it will be more happier when the gift is made by themselves. According to my experience, i am sure that its not only the receiver feel happy when they get it but also the maker feel happy when she/he makes it. Believe me! you will see what i say is true if you try to do it once. 
Don't you know where you should start? just follow these below steps, you can do it easily. This is the card i made for my love to say thanks without any occasion ( sometimes we should make our lover surprise to warm the love  up :p)
       
Let's do !

     What we need:
P.1
                                                                               
         Paper
         Scissor
         Paper-knife
         Double sided tape
Step:1


 Cut the paper two pieces ( two cards) like in the picture (P.2 ): size 10cm x 10cm
 You can chose the bigger size or smaller one you wish


Step:2
P.3


 Draw a heart on the single side of each cards.     Here i use a heart-shaped pattern i cut it before to draw. If you are skilled, you can draw it directly. (P.3)


P.4


Use paper-knife to cut the heart out (P.4)


P.5


After cutting the heart out we get two card like in the picture P.5


Step 3:  


P.6


Cut a square-shape paper 10 cm x 10 cm and glue it on the heart side of the first card 
Note that: we only glue the border of square-shape paper , so that we can put any picture between it (P.6)


 Next: Glue the second card on the rest side of square-shape paper like in the picture (P.7)


Then we get a card like this P.8


Decorate a little  and put the favorite picture inside then we got it.


Back side you can write love words or everything you want.


Thank you for following .
Have a nice day

(Thocon)